If you use Microsoft Entra ID, you can connect your directory to Systam Studio. After that, you no longer need to create Systam Visit hosts manually. This guide explains how to enable automatic user synchronization with Microsoft Entra ID.
Note: This extension is a paid add-on and requires activation. Contact our support team at support@systam.io.
Once the setup is complete, Microsoft Entra ID can:
- create users, meaning hosts, in Systam Studio
- update user details in Systam Studio, such as primary workspace, name, email addresses, phone numbers, and active status
- delete users permanently from Systam Studio when access is no longer needed
- keep user data synchronized between Microsoft Entra ID and Systam
Read more about Entra ID and provisioning: What is automated app user provisioning in Microsoft Entra ID.
Before you start
Prerequisites
- a Microsoft Entra tenant
- a Microsoft Entra ID account with the Cloud Application Administrator or Application Administrator role. You need one of these to create the enterprise application in Step 3. Once the application exists, its Application Owner can also manage provisioning. Global Administrator works too, but it gives more access than this setup needs.
- a Systam organization account at app.systam.io and a user account with Organization Owner permissions
Good to know
- Microsoft Entra ID runs the sync roughly every 40 minutes, so a change made in Entra can take a little while to reach Systam.
- Users are deleted permanently. Systam does not support suspended or soft-deleted users. When a user is removed from synchronization or disabled in Entra ID, Systam deletes the user permanently. If the user is added back later, they are created again as a new user.
Step 1: Plan the provisioning setup
- Learn how the provisioning service works.
- Define who is included in provisioning.
- Define which data is mapped between Microsoft Entra ID and Systam.
Step 2: Prepare in Systam Studio
- Open Systam Studio and go to Extensions → Microsoft Entra ID. Select Enable.
- Copy the values shown in Studio for Tenant URL and Secret Token. You will need them for the Entra ID setup.
- You can also enter your organization's Tenant ID if you want. This helps with troubleshooting.
- You can't generate a new Secret Token yourself. If you ever need one reissued, for example if it has been exposed, contact Systam support.
If your organization has more than one workspace, you'll also set up workspace assignment on this same page. See Step 6.
Step 3: Add Systam to Microsoft Entra ID
- Sign in to the Microsoft Entra admin center as an administrator.
- Go to Identity → Applications → Enterprise applications.
- Select New application.
- Select Create your own application.
- Give the application a name, for example Systam.
- Select Integrate any other application you don't find in the gallery (Non-gallery).
- Select Create.
Step 4: Define who is included in provisioning
With the Microsoft Entra provisioning service, you can define who is provisioned to the application. You can limit provisioning either by assignments made to the application or by user or group attributes. If you use application assignments, you can define users and groups with this guide: Assign users and groups to an application.
- Start small. Test first with a small set of users and groups.
- When the provisioning scope is set to assigned users and groups, you can roll out the setup in steps.
Step 5: Enable automatic synchronization
In this section, you configure the Microsoft Entra provisioning service to create, update, and delete users in Systam.
5.1 Admin Credentials
- Open the Provisioning tab in the Systam application in Entra ID.
- Go to Manage → Provisioning and set Provisioning Mode to Automatic.
- Enter the values shown in Systam Studio:
- Tenant URL
- Secret Token
- Select Test Connection to verify the connection.
If the test fails:
- make sure the token was copied correctly
- check that there are no extra spaces
5.2 Attribute mappings
Systam uses a limited set of Microsoft Entra ID user attributes for provisioning. These mappings are configured on the Provisioning tab of the Systam enterprise application.
Identity and status
userName
- A unique identifier for the user in Systam.
- The value comes from the source attribute you define for the
userNamemapping, usually a sign-in name such as UPN or email address.
active
- Defines whether the user account is active in Systam.
- The value is based on the expression defined in the
activemapping.
Contact details
Systam uses email addresses and phone numbers of type work and other. Other types are ignored.
- Email addresses
- Each user needs an email address of type work or other. Systam uses the work address when both exist.
- A user who has neither a work nor an other address isn't provisioned.
- Phone numbers
- Phone numbers are optional. Systam uses numbers of type work and other; other types are ignored.
- If you don't want to manage phone numbers in Systam, leave phone numbers unmapped.
- Systam converts phone numbers to international format automatically. See How synchronization behaves below.
Example mapping configuration
| Systam attribute | Microsoft Entra ID attribute (example) | Required |
|---|---|---|
userName | userPrincipalName | Yes |
active | Switch([IsSoftDeleted], , "False", "True", "True", "False") | Yes |
name.givenName | givenName | Yes |
name.familyName | surname | Yes |
emails[type eq "work"].value | Coalesce(mail, userPrincipalName) | Yes* |
emails[type eq "other"].value | first([otherMails]) | No |
phoneNumbers[type eq "work"].value | mobile | No |
phoneNumbers[type eq "other"].value | telephoneNumber | No |
preferredLanguage | preferredLanguage | No |
* Recommended. Each user needs a work or an other email address.
Step 6: Assign users to workspaces
Every user needs a primary workspace to appear in Studio and sign in. The primary workspace is also used as a default value in different functions.
Once a user has a primary workspace, it stays. Group changes never move it. It changes only when Entra ID sends a different workspace value for that user.
How many workspaces does your organization have in Systam Studio?
6.1 One workspace
- Nothing to configure. Systam links every new user to your workspace automatically.
- You can skip the workspace mapping in Entra ID entirely. Studio shows the workspace mappings only when your organization has more than one workspace.
Note: If you add a second workspace later, users created after that need one of the methods in 6.2.
Continue to Step 7.
6.2 Several workspaces
Step A: Choose the sync mode
In Systam Studio, go to Extensions → Microsoft Entra ID and choose how users are added to workspaces:
- Primary workspaces: each user is linked to one workspace.
- All workspaces: each user is linked to every workspace and still has one primary workspace. In this mode a user always ends up with a primary workspace, even when none of the methods below finds one.
Note: If you later change the setting to Primary workspaces, users are not removed automatically from the other workspaces.
Step B: Choose how Entra ID tells Systam each user's workspace
Pick the method that fits your organization. The options are listed in the order we recommend.
Methods 1 and 3 need a custom workspace attribute in Entra ID. Add it first:
- Open the Provisioning tab for the Systam application in Entra ID, then open Attribute Mapping.
- Select Provision Microsoft Entra ID Users.
- Scroll to the bottom of the page and select Show advanced options.
- Select Edit attribute list for Systam (or the application name you chose).
- Add a new attribute at the end of the list:
- Name:
urn:ietf:params:scim:schemas:extension:systam:2.0:User:primaryWorkspace - Type:
string
- Name:
- Select Save.
Method 1: Attribute (recommended)
Use this to assign users precisely to different workspaces based on an attribute such as department, office location, or country.
Systam checks the attribute first. When the attribute gives a workspace, group mapping is ignored for that user. You can use this method together with Entra group mapping (Method 2).
In Entra ID:
- Return to the Attribute Mapping view and review the default mappings.
- Add a new workspace mapping:
- scroll to the bottom of the list and select Add New Mapping
- Source attribute: select the Entra ID attribute you want to use for the user's workspace, for example
department,officeLocation, or an extension attribute - Target attribute: select the custom attribute
urn:ietf:params:scim:schemas:extension:systam:2.0:User:primaryWorkspace
- Select OK.
- Select Save.
In Systam Studio:
- Go to Extensions → Microsoft Entra ID.
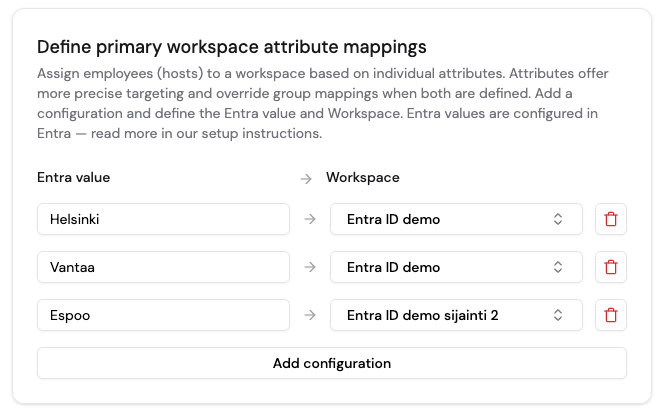
- Scroll down to Define primary workspace attribute mappings.
- Click Add configuration and enter a value that may come from the attribute you mapped.
- Select which workspace should be the primary one and save the changes.
- Repeat until every value you want has been mapped.
Method 2: Entra group
Use this to assign the workspace based on the Entra group a user belongs to.
A group sets the workspace only for a user who doesn't have one yet, at the moment Entra ID adds the user to the group. If Method 1 already gave the user a workspace, the group is ignored.
- Define which groups are in scope for provisioning and note each group's Object ID from Entra ID.
- Open Systam Studio and go to Extensions → Microsoft Entra ID.
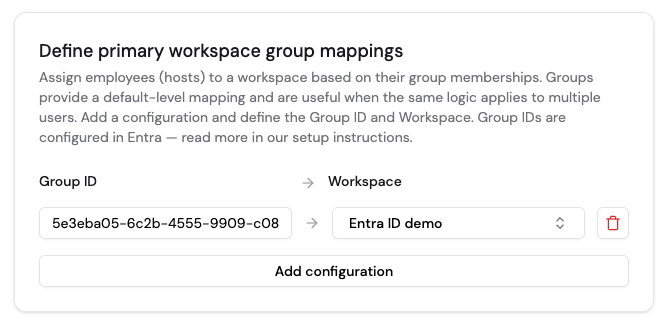
- Scroll down to Define primary workspace group mappings.
- Click Add configuration and enter the group's Object ID in the first field.
- Select which workspace should be the primary one.
- Repeat until every provisioned group is mapped to the correct workspace.
- Save the changes.
Method 3: Constant value
Use this if everyone should get the same primary workspace.
In Entra ID:
- Return to the Attribute Mapping view.
- Add a new workspace mapping:
- scroll to the bottom of the list and select Add New Mapping
- Mapping type: Constant
- Constant Value: enter the value that Systam will use, for example
systam - Target attribute: select the custom attribute
urn:ietf:params:scim:schemas:extension:systam:2.0:User:primaryWorkspace
- Select OK.
- Select Save.
In Systam Studio:
- Go to Extensions → Microsoft Entra ID.
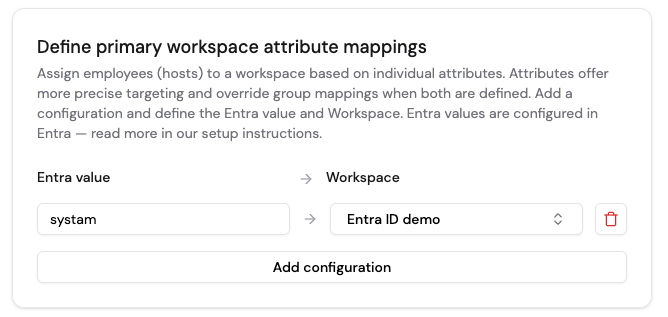
- Scroll down to Define primary workspace attribute mappings.
- Click Add configuration and enter the constant value you defined earlier.
- Select which workspace should be the primary one and save the changes.
Method 4: Fallback workspace
A fallback workspace receives every new user whose workspace couldn't be found from the attribute or constant value.
- In Systam Studio, go to Extensions → Microsoft Entra ID.
- Choose the fallback workspace and save the changes.
The fallback applies only when a user is created. It never moves a user who already has a workspace. If the fallback workspace is deleted, the setting no longer applies.
If you use Entra group mapping, do not set a fallback workspace. New users would get the fallback workspace before Entra ID adds them to their groups, and the group mapping would not apply.
What if nothing matches?
- The new user is still created. The request doesn't fail.
- With a fallback workspace, the user goes there.
- With All workspaces mode, the user is linked to all workspaces.
- Otherwise the user exists but can't sign in or appear in Studio until they get a workspace: later through an Entra group mapping, a corrected value from Entra ID, or an administrator in Studio.
Step 7: Test and start synchronization
Test a single user
- Select Provision on demand.
- Select a test user.
- Run the action.
- Check in Systam Studio that the user appears in the right workspace.
Enable automatic synchronization
- Set Provisioning status to On.
- Select the scope you want to use.
Monitor the status
- Check the provisioning logs.
- Monitor the provisioning status.
How synchronization behaves
- Matching existing users. Provisioning first looks for a user in the same organization with the same SCIM
userName. If none is found, it looks for a user with the same email address in any Systam organization. Systam compares the address it stores for the user: the work email, or the other email if Entra ID sends no work email. Otherwise, Systam creates a new user. Microsoft Entra ID's internal object ID is not used for matching. - Workspaces are sticky. A primary workspace is kept once set. Removing a user from a group doesn't remove the workspace. Only a new workspace value from Entra ID moves it. Deleting a group in Entra ID doesn't affect users or their workspaces.
- Groups never set roles or permissions. They only affect the first workspace assignment.
- Uninvited visitors is turned on. Whenever provisioning sets a user's primary workspace, the user's Uninvited visitors setting is turned on for that workspace. This also happens when Entra ID sends a workspace value for an existing user, even if an administrator turned the setting off in Studio. In All workspaces mode, the setting is on in every workspace the user is added to.
- Deletion. Removing a user from scope or disabling them in Entra ID deletes the user permanently.
- Organization Owners are never deleted. Only their link to Entra ID is removed. The user and their role stay.
- Synced fields can't be overridden per user in Studio. Microsoft Entra ID overwrites them on every cycle.
- Phone numbers are converted to international format using the country of the user's workspace. A user without a workspace uses Finland. If the user gets a workspace later and the number had no country code, the number is converted again with that workspace's country.
Troubleshooting
Common errors in the provisioning logs
| Error | What it means | What to do |
|---|---|---|
| 401 Unauthorized | The Secret Token in Entra ID doesn't match the one in Studio. | Copy the current Secret Token from Studio into Entra ID again. More than about 20 failed attempts in a minute triggers a short-lived block. |
| 403 Forbidden | The user's email address is already used by a user in a different Systam organization. | Contact Systam support to sort out which organization should own that user. |
| 409 Conflict | The SCIM userName is already linked to a different user in this organization. | Contact Systam support to check the existing link. |
| 400 Bad Request: "primaryWorkspace not mapped" | Entra ID updated an existing user with a workspace value that doesn't match any mapping in Studio. | Add a mapping for that value in Studio, or correct the value in Entra ID. Entra ID retries on its next cycle. |
Microsoft Entra ID automatically retries failed operations on its next sync cycle, so a corrected mapping or token usually resolves the error without any extra steps.
Turning off the integration
In Systam Studio, go to Extensions → Microsoft Entra ID and select Stop using the extension. This stops synchronization and removes the integration from Systam.
It doesn't remove the enterprise application from your Microsoft Entra tenant. If you no longer need it there, remove it in the Entra admin center.
Current limitations
- Keep group names unique in Entra ID. Entra ID uses the name to find an existing group in Systam.
- Synced fields can't be overridden per user. Microsoft Entra ID always overwrites them on the next sync.
That's it. New colleagues now show up in Studio without anyone adding them by hand.
More information
Was this article helpful?
That’s Great!
Thank you for your feedback
Sorry! We couldn't be helpful
Thank you for your feedback
Feedback sent
We appreciate your effort and will try to fix the article